I’m quite excited about the firing coming up in late October. I’ve had some extra time to get pieces together for it, and I feel like it’s paying off. I think I’m on track to make enough work for my galleries, and have a holiday sale at my studio. I’ll post dates and stuff like that once I have them, but in the mean time, here’s more of a sneak peak at my drying shelves.
These are the ones that I finished most recently.
Also, in my studio, I have a big white board. I use it to make random notes to myself, sketch ideas, and just doodle stuff. I really like the idea I have on there now, but I’ll have to wait and see as to how it comes together. I’ve been big on antlers recently, but I don’t know how well they’ll survive the firing. They might just droop. To avoid that, I’ll have to make them very stocky. Also, do you you recognize the guy in pink?
When I work on my regular sized beasts, I tend to make them in batches. I’ll start with about 3 to 6 balls of clay, and work on them in parallel over the course of a few weeks. Often each step in the process of making a beast will only take an hour to half hour, but I’ll need to let the parts rest and dry for a day between each step. This makes sure that seems don’t reopen or wet legs don’t get attached to dryer bodies. I’ll often spend a morning or a day doing nothing but making legs or sanding backs.
I find it very amusing to watch the clues as to the progression of time: What I’m wearing, what color bandana I have, if I have a soda, and how messy my work area has gotten.
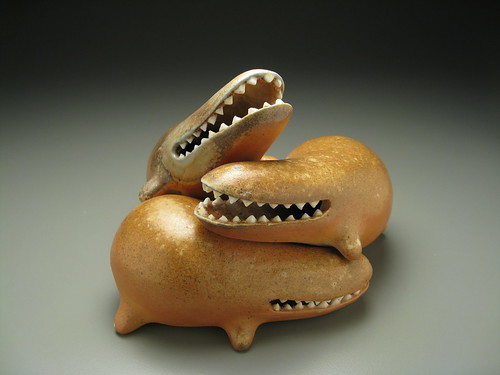
Before this last firing, I filmed all the steps in sculpting one set of beasts. I’ve been calling it “Trio”, but in some ways it’s also “Cuddle” #2. I liked the beasts I made for “cuddle” and wanted to see a larger arrangement of them. It was surprisingly hard to figure out how to make the three fit together. Anyway, here’s the timelapse video fully tracking them from beginning to end.
I really like arranging my beasts in groups. And this sort of lumpy, toothy form really appeals to me. For a bit, I’ve been meaning to make a pile of 10 or 20 guys. Maybe next firing I’ll have time.
I broke my camera (a Canon SD700) a bit ago and replaced it with a SD850. It’s the exact same camera, but with more megapixels, and, as I discovered, a time lapse video mode. I’m pretty excited about this, and have been making timelapse videos of making sculptures. This is my first one.
This is the process of putting teeth into a big guy that I was making. He’s since turned into CityBeast 2.0, a bigger and more elaborate version of an earlier sculpture. The video covers a hour and forty minutes, as I make the teeth, arrange them, and then secure them. Following is my second video experiment.
That was just just put together with the tools I had on hand (Windows Movie Maker). I’m not completely happy with the captioning, but it’s still pretty fun, all in all. I’ve since had time to follow some creatures from start to finish with the camera. I just need to sort the video and put it together, which I’ll hope to do sometime in the next few weeks. You can be sure that it will be here once it’s done!