My work is now available in a new online curio shop called The Odd Luminary. The Odd Luminary presents itself as being dedicated to an eclectic elderly gentleman, and his unworldly travels. The benefit to you and me is we get to peruse the wonderfully curated collection of handmade oddities that he brings back.
The site is divided into several categories ranging from the vivarium to the laboratory, where my contented beasts are featured. One of my pieces, “Rock/Nest” is even available exclusively through them. Exploring the site with all its art and goods seems to be a delightful way to spend an hour or two.
I recently had a chance to do a pit firing with Hilary Chan. He’s a great guy with a fairly fascinating ceramics blog. One of the most exciting things about doing the pit firing with him is the way he approaches it so scientifically. He’s from a tech background, and has made a scientific approach a key part of his artist process. While I try and take the occasional note (seldom referring back to them), this man is as thorough and as consistent as I could ever dream to be . He photographs every piece during ever stage of preparation and firing. He works to build theories from his notes, striving to prove or disprove them every firing. As someone from a scientific background myself, I found it awesome and inspiring. The whole experience has impressed in me the idea of pit firing as a petri dish, a small scale arena to experiment and explore, as I wait for the fall wood firing. Anyway, scientific musing aside, I figured it would be fun to explain exactly what a pit firing entails.
Pit firing is a very primative firing method. By primitive, I don’t mean unsophisticated, but rather ancient. Basically, as most cultures developed ceramics, some sort of pit firing was first way that folks figured out how fire their pots. It’s pretty low temperature, which means the finished pieces aren’t super sturdy and can’t be covered in glaze, like you can with higher temperature firings. However, it’s hot enough the pot isn’t going to dissolve back into mud if you put water in it, which is pretty darn useful for an emerging civilization. While most cultures figure out how to build kilns, and to heat their pottery to higher temperatures, some stuck with pit firing, developing the method to create incredibly beautiful work. The example that always comes to my mind is the pueblo potters of the southwest united states, including the beautiful black on black work by Maria Martinez.
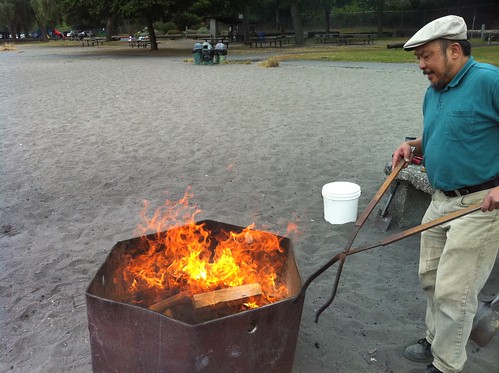
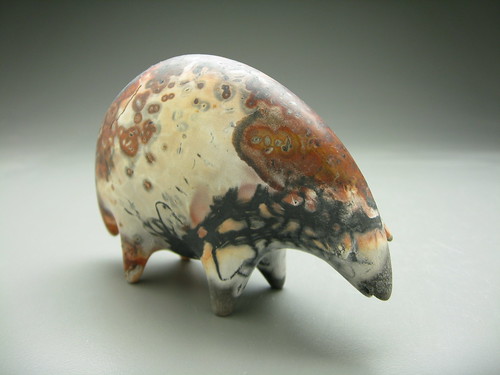
There seems to be nearly infinite ways of setting up and doing a pit firing, so I’m going to stick to describing the pit firing I did with Hilary. We did the largest bit of preparation before hand. Each piece was wrapped in copped wire (specifically, a choreboy, those copper things made for scrubbing pans.), followed by steel wool, followed by salt water soaked burlap or straw. All of the salt, the copper, and the iron all fume at high temperature, leaving an assortment of colors on the clay. Once that initial prep was done, we placed each one in a labeled brown paper bag, ready for the fire pit. For my pieces, we had to experiment some, putting protective grills above the pieces, to avoid snapping of wings and beaks. I feel like figuring out how to protect my delicate beasts is going to be the biggest issue for my exploration of pit firing. As we loaded the pit itself, we put down layers of sawdust, copper carbonate, horse manure, paper, and wood. I actually made a timelapse of the whole loading process that sums up the set up pretty well.
The whole firing, once we lit it up, took maybe an hour. We had campfire sized flames for even far less than that. The only time issue was the cooling of the pieces. We let everything cool for an hour or two, before my impatience got the better of me and I started digging out pieces. The results were great, but the rapid cooling just proved too much for pieces, leaving several with cracks. Apparently, the number one way to avoid this is to let the pieces cool in the ashes over night, which brings me back to the idea of my very own mini-firepit, in my very own backyard. I have some plans as far as that, but that’s for another time.
The design blog Totonko just posted some great work by artist Dan McPharlin. He seems to mostly work with digital media, though he also has some interesting diorama pieces. His spaceship pieces are what caught my eye, though. They’re wonderful and remind me of childhood memories of “The Yellow Submarine”, along with beautiful retro science fiction covers.
His website has a down-loadable portfolio, but flickr seems to be the way to follow him. I can’t wait to see what he makes next
As a total amazing bonus, it turns out he’s also the genius behind these! He’s made a series of tiny, perfect, papercraft models of analog synthesizers. I saw them on the tech blog unplgged.com a while back, and was blown away. It was only today as I was exploring his flickr stream that I realized that the beautiful scifi prints and the papercraft synths were made by the same person.
Coming up in May, I’m going to be taking part in an exciting show called “Denizens of the Forest King” at the Twilight Art Collective, located in West Seattle. It will be Justin Hillgrove, Mike Capp, and myself presenting all manor of monstery beasts! Here’s a bit about the line up!
ABOUT THE SHOW:
Come glimpse the Forest King’s realm and the creatures and oddities under his stewardship. New works by Justin Hillgrove, Eva Funderburgh and Mike Capp.
Justin Hillgrove grew up in Snohomish, WA and has been enjoying artistic expression since he was old enough to color on the walls. He studied Design and Illustration at Seattle Central and has since enjoyed many years of freelance illustration and design, working on everything from collectible card games to toys. He paints monsters, imps, robots and other oddities in satirical, sweet or uncomfortable situations he finds amusing, many of which are inspired by his children. Justin has showed at galleries and shows all over the country, with collectors all over the world.
Eva Funderburgh is a Seattle artist, who makes strange and slightly whimsical ceramics monsters. While technically a native Seattleite, she has spent most of her life so far in Kansas and Pennsylvania, but is glad to now be back in the land of rain and delicious salmon. A graduate of Carnegie Mellon University, she’s been working on art full time for the past few years, and has created a world of fat, elegant, and clumsy beasts. Her sculptures are finished in a wood fired kiln, an anachronistic process more connected with the Japanese tea ceremony that with the present art world. The end results are beasts that share influences from comic books to Greek myth to Japanese anime, but yet are truly unique.
Mike Capp is an accomplished artist who finds inspiration for his artwork through his children’s creativity and pop imagery. His paintings don’t really mean anything dangerous, angsty or irksome. There’s no bubbling social commentary. His paintings which incorporate his young children’s’ drawings aren’t meant to provoke the unarticulated terrors of childhood. They’re just drawings of monsters, superheroes and robots. Even though there’s plenty of angst behind his humor, more so there’s a playful, impish, boy’s mind, full of cartoons and KISS memorabilia. His technique is solid and clean, so he affords himself the privilege of choosing subject material that is loose and silly, while still keeping a close eye on small details of color and composition. He paints what feels good and what results are paintings that are funny and frivolous, in a good way. It’s not as important to understand what his paintings mean, as it is to understand that they are just what they appear to be.
Hey Folks!
Starting this weekend, two pieces of my work will be on display at the Eyelevel BQE in Brooklyn. It’s a group show, with a grade A line up of artist and designers, including my brother Dan Funderburgh. The show is March 20th through April 4th, and the gallery is open weekends noon to 6pm, and weekdays by appointment. Check it out if you’re in the area.
A while ago, my husband and I teamed up to collaborate on some sculptures. He’s a software developer by occupation, and we both appreciate the interesting world where tech and art overlap. We decided to work together, and have slowly been developing a series of glowing sculptures. While it’s been a while since we finished the last one, we decided it would be fun to talk about some process, and share some of the programing and tech behind them.
Ever since I saw some translucent porcelain lamps made by Terry Inokuma, I’ve wanted to make a glowing creature. The ultra white porcelain (Southern Ice) I use for teeth in my sculptures also has the property of being amazingly translucent, something I don’t normally pay attention to in a clay. However, a couple years ago I decided to see what I could do with it. The first creature I made to explore the idea of glowing creatures was Glowbelly, a little round fat beast, whose belly reminds me of a pale frog. I used a mix of southern ice and my typical clay to make its belly, making it both paler and theoretically translucent. However, we’ve never been able to find out for sure. As soon as got the beast out of the kiln, it became clear that there were some aspects of electronic beasts that I’d neglected to take into consideration. Namely, the ability to put wires into the beast, the ability to block excess light and direct the LEDS, and the all important on and off switch. While I had a loose idea of just sliding all the electronics in through the mouth, it became clear that much more planning would be required for glowing creatures.
The next step on our experimentation was the Industrial City Beast. By planning ahead, we were able to set up easy access to power switches and wiring. The wiring of the beast was very simple, just a battery, a few LEDs and a resistor or two. (We started playing with the more complex wiring and microcontrollers later). However, we discovered how important the quality of the light was. The beast was to have glowing red eyes, but with the LED just in there, it was as empathetic as a laser pointer. We experimented with a number of materials as diffusers, to give the beast a warmer glow. In the end, we discovered shapelock plastic. This semitranslucent plastic can be heated in boiling water and will become malleable, but hardens on cooling. The stuff is great! It’s designed for rapid prototyping, and it can be reused indefinitely and machine tooled as well as hand formed. It solved two problems at once by both securing and diffusing the red LEDs in the neck of the beast. The white LEDs for the city were reflected internally by covering all internal surfaces with tinfoil, which helped make the light less directional.
However, the present pinnacle of our collaboration together is the Glowback. We finished it up last year, but got distracted before writing about the process of making it. However, the process is still fascinating, and the result is one of our favorite pieces.
Like many of my woodfire pieces, the beast is a mix of different clays. I used a mix of porcelain and stoneware for its body, southern ice porcelain for its teeth, and a mix of southern ice porcelain and B-mix porcelainious stoneware for the pods on the back. This was so the body with have some grit and texture, the teeth would be white, and the pods would be pale and translucent from the southern ice, but still have some color and crystallization due to the B-mix. Since the beast isn’t very large, about 6″ long, the difference in shrink rates between the clays didn’t cause too many problems. (Porcelain shrinks about 14% from start to finish, while stoneware will only shrink 10%. If there’s long connected seams, the difference in shrink rate can cause the piece to crack.)
Each bulb on the back of the beast contains a super bright LED mounted in a styrofoam plug, which in turn is secured within the beast. Two of the bulbs were removable, which while seeming adequate during construction, turned the wiring process into a laparoscopic surgery. However after much swearing and and many minor burns from hot glue, all the LEDs were in place.
There’s 11 LEDs in all, and they’re controlled by an arduino microcontroller. (I can’t recommend arduino enough if you’re thinking about getting into this sort of thing.) We programed them to fade in and out in a vaguely hypnotizing pattern. Since the arduino only has enough pins to control 6 things independently, the five largest bulbs pulse independently on random timers, while the six small bulbs pulse all at once. Figuring out the correct rate of fade involved some very interesting math. Here’ssomevideos of the different patterns we tried. My husband Ben’s blog post goes into greater depth about the programing and wiring.
Eventually, once all LEDs were in place, the arduino (we used a smaller arduino clone called a boarduino), was wrestled into place inside of the beast. This ended up being the most difficult part of the process – I’d underestimated the amount of working room needed, and the amount of room the wires would take up. In fact, lack of internal space, and the access to it was in generally the most challenging aspect of the sculpture. Even the thickness of the wires factored into the difficulty – they keep popping off the dome that covers the power switch!
However, the end result is pretty awesome. We had a huge amount of fun constructing it, and I believe it’s lived up to our expectations. Since it’s a fairly experimental beast, it isn’t for sale. Here’s a final documentary video showing off the final completed beast.
This weekend, I have a two person show opening at the Northwinds Art Center and Gallery, in Port Townsend, WA. It’s a neat little gallery, in a neat little town. Port Townsend is the city that thought it was going to be Seattle, back in the 1880s, before railroads. Once it became clear that Seattle was to be the major port for the area, all development stopped in Port Townsend. In the late 1980s, everyone realized that there was a very cool perfectly preserved Victorian seaside resort two hours from Seattle, and it’s been hopping ever since.
The show will be with Don Tiller, and will be up for the whole month of August. There’s going to be a a variety of events going on during the month, with an art walk reception on the 1st of August, a Saturday, and a coffee talk on friday the 7th. I won’t be able to be there for the art walk reception, but the coffee talk should be fun. Don Tiller and I will both take some time to talk about our work and the process of creating it at 7pm at the gallery.
I just swung by the gallery dropping off work, and everything is looking great. My work is a selection of some of the best larger pieces from the past year or so, along with some new, saggar fired work. Saggar firing is a technique that is very reminiscent of the pit firings often seen in southwest native American pottery. It’s a technique that I’d long been curious about, and have finally been exploring. It serves as a good counterpoint for woodfiring, since it very similar in unpredictable nature. I’ll do a post about the whole process pretty soon, assuming I can stay out of the studio long enough to write it up!
I’m also trying something new this show. I’m making a flickr set of all the work, and making everything available for purchase online. Each piece will have its purchase information and the contact information of gallery manager listed in the description. If you see something you’re interested, just send the gallery an email, and they’ll take if from there!
I got to spend a lot of quality time with my brother, which ranged from just catching up to discussing art. It was a chance to go out and explore the galleries of Chelsea, and I also got to explore the Museum of Art and Design. All in all, it was a great chance to get out and see all sorts of art, ranging from innovative and crazy uses of materials, to astounding minimalistic installations consisting of nothing but a couple taut strings in a room. My brother has a write up of some of it on his blog.
While I as in NYC, I was lucky enough to be posted on two exciting blogs. The Urban Outfitters Blog decided to highlight my work, as part of a continuing stream of cool and interesting things that they find. Kitsune Noir, a blog of art and design, also decided to mention my work and the collaboration with my brother. As a long follower of Kitsune Noir, I was completely flattered by this! However, as a side effect of all of this attention, I’m about completely out of work that’s for sale online! I’m going to have to recall a few pieces from galleries this weekend, so I can more available for sale. There will also be all new work coming up in April, after my next wood firing.
The collaboration piece with my brother isn’t finished yet, since we couldn’t find a kiln that was firing while I was there. We’ll be seeing the results in the next few weeks. In the meantime, you can find some fun in-progress photos here.
There’s been a few things I found recently that seemed worthy of passing along. First off is the mysterious myspace artist known as Milk / Logyu. I found her work a little while ago due to random site called NotCot. She has no portfolio site, or really any information out there. There’s pretty much only her myspace profile that tells you that she’s 32 and from Tuscon, and her mind blowing work. What I love so much about it is her use of tiny continued themes, such as her skeleton birds, cards with hearts, and mp3 players. Have fun perusing her fascinating work. I wonder if her work only exists in the digital world?
Next is an oddly equally fascinating medieval beastiary. It’s truly fun to explore. It has a huge list of creatures, with each one having examples of medieval art and an explanation of what it was, along with bibliographic sources for the earliest references. Sure, it has all the standard creatures like hyenas and dragons, but it also has weird ones like … Barnacle geese?? And also, who knew that asps were originally lion- like creatures that guarded trees. To avoid being lulled to sleep by music, the asp would keep one ear pressed to the ground, and the other plugged with its tail.
The one other thing worth passing along is that I’ve been working to clear out my flickr backlog. I have unsorted and un-uploaded photos that go back to the last fourth of July. So if you follow my flickr feed, please enjoy chronologically random stuff that should be showing up over the next bit or so.
So I have a link to my brother’s site on my “connections” page, but I don’t think I’ve had a chance to talk about him here yet. In short, he’s an awesome artist up in NYC. While I work away in my ceramics studio, he works away with a Macintosh. He makes beautiful, tight artwork, very influence by Victorian wallpapers. In fact, he has made wallpapers before, beautiful ones, that a place in Brooklyn hand silkscreens. One thing that always makes me smile about the possibility of getting a house of our own, is the fact that we could put up some of it. Anyway, I really recommend checking out all of his work. It’s amazing
Anyways, here’s what is causing me to make a post on Dan right now. He’s teamed up with Geekhouse Bike to make beautiful bicycle that was inspired by Obama’s 2004 “There are no red states and blue state, only the United States” speech. The bicycle, is beautiful done in tight paterns of red, blue, and white. It’s presently for sale on Ebay, with all proceeds going to the Obama caimpaign.